

Sorry it has been a while, Glossers! I was too busy having fun Alternative Spring Break adventures to be able to DIY my way into your hearts even further. But these first couple of weeks back have brought a lot of unwanted stress (and social justice rage. I’m looking at you triggering “genocide awareness” display in Lowry Mall) in my life because I kind of forgot that school was a thing for a week. But that is nothing some crafting can’t fix! Plus, this kind of crafting includes sparkly things, and anyone with animalistic instincts is attracted to sparkly things.
Your sparkly ingredients:


But wait -- one lucky College Gloss Mizzou reader will win a glitter iPhone 4/4S case carefully crafted by Veronica DeStefano. All you have to do to enter this social media giveaway is repin this DIY on Pinterest, retweet this tweet on Twitter OR share this post on Facebook! So get to your social media site of choice and get entered to win!
- Mod Podge (I used the gloss finish)
- GLITTER (I used that ridiculous amount I still had from my glitter ornament DIY. They are Tulip Fashion Glitters.)
- Sponge brushes
- Something to mix the glitter and Mod Podge in (Those Shakespeare’s cups that I swiped the last time I went there really come in handy.)
- Plastic phone case (Not one of those floppy, silicone ones!)
Once your sparkle avengers are assembled, you may begin your sparkle crime fighting by laying out some newspapers (something like USA Today because their level of actual news is questionable) to catch all your glittery fun and prevent you from totally trashing your workplace. Then you can start mixing the Mod Podge with glitter in your container of choice. There isn’t any exact measurement given in the instructions from Pinterest. They literally tell you to “eyeball it” and use one part Mod Podge to two parts glitter. I used my entire little tube of glitter with Mod Podge that was about 1/4 to 1/2 of an inch at the bottom of my Shakespeare’s cup. The goal is to have a white-ish mixture that you can still see the glitter through. A craft (and life) motto is that the more glitter, the better it will be. That actually is really accurate for this because you want a lot of glitter to be in the mixture because the last time I checked this is a project for a “glitter” phone case not a “Mod Podge with a bajillion coats to try and get enough glitter” phone case.


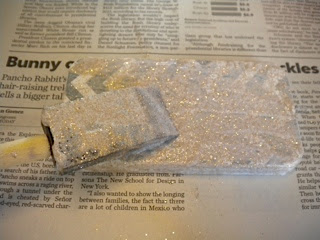
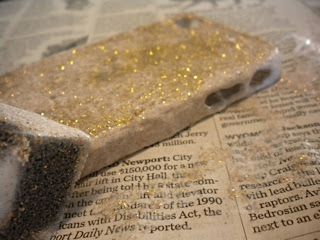
Once you feel comfortable with your glitter and Mod Podge mixture, it is time to dive right in with that handy dandy sponge brush. Paint the case in any manner you please. If you have some design in mind, it might be beneficial to start by stenciling it out with painter’s tape or something similar unless you are really confident in your free handing skills. My plan was to just use the gold glitter as an overall color and then add black stripes on top of it, so I just had a free-for-all and did one full coat over the case (but not on the inside part, of course). The mixture is going to kind of look like glittery boogers when you paint it on, but do not fret! The Mod Podge is magical (have I expressed my undying love for Mod Podge yet?) and will dry clear. IT IS JUST WONDERFUL.

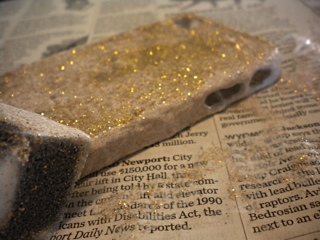
Now, this is the hard part. You are going to need multiple coats. But, you need to have patience to do those multiple coats. You need to let the glitter glue of sorts dry for 20 minutes or so between coats. Do NOT be overeager and try to paint another coat before it is ready because then you WILL pull up some of the glitter that was already there and you will be sad because that is more painting and waiting that you have to do. SO JUST WAIT. PATIENCE IS A VIRTUE.
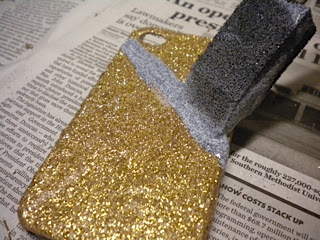
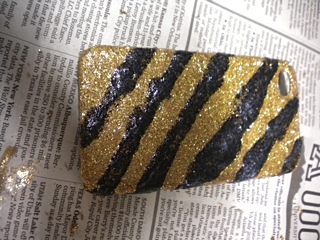
Once you have patiently waited between coats and gotten the right amount of glitter for your base color, follow that same trial and error process to mix another glitter concoction in a different color if you so please. As I said, I am expressing my Mizzou spirit, once again, and I am making the case gold with black stripes, so I mixed some of my black glitter with Mod Podge. I just free handed my stripes, which made them look kind of like tiger stripes because they weren’t exactly even and straight. I mean, I totally meant to do it like that... I only needed like one and a half coats for that (the half is how I had to touch up some bald spots in the stripes). Once again, be patient and wait for it to dry before picking it up or else you will just end up with sticky glitter on your hands and sadness.
Once you have patiently waited between coats and gotten the right amount of glitter for your base color, follow that same trial and error process to mix another glitter concoction in a different color if you so please. As I said, I am expressing my Mizzou spirit, once again, and I am making the case gold with black stripes, so I mixed some of my black glitter with Mod Podge. I just free handed my stripes, which made them look kind of like tiger stripes because they weren’t exactly even and straight. I mean, I totally meant to do it like that... I only needed like one and a half coats for that (the half is how I had to touch up some bald spots in the stripes). Once again, be patient and wait for it to dry before picking it up or else you will just end up with sticky glitter on your hands and sadness.


Your patience has paid off! You now have a phone case that shines as brightly as you (holy cannoli, that was cheesy)! This glitter and Mod Podge love connection is good for painting onto other materials, like glass or wooden letters, especially for you Greek folk. As always, happy crafting, and go Tigers! Glitter on!
But wait -- one lucky College Gloss Mizzou reader will win a glitter iPhone 4/4S case carefully crafted by Veronica DeStefano. All you have to do to enter this social media giveaway is repin this DIY on Pinterest, retweet this tweet on Twitter OR share this post on Facebook! So get to your social media site of choice and get entered to win!
WINNER: JESSICA KAISER
Columbia area residents only please.


0 comments:
Post a Comment