

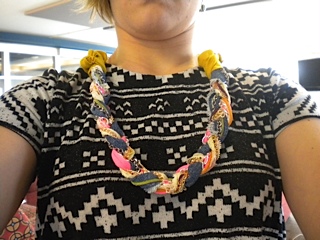
The downside to filling my time with school work, watching copious amounts of “Veronica Mars” and listening to Justin Timberlake’s new album on repeat is that I may forget about my love of crafting. But, never fear, Glossers! The perks of being a pro DIY-er (let me at least think I am a pro) is that I have procured many craft supplies and scraps that I can use for other projects. If you have been following me on this craft journey through my columns, you too probably have a stock of crafting scraps lying around. This lead me to this week’s DIY, which is making a chunky, braided statement necklace.
The stuff you need to find around your room or at Michaels:
- Lots of necklace chains (one will have to be the longest to be the base)
- Ribbons/trims (lace on crochet on lace)
- Cording (get it in leather if you are B.A.)
- Jump rings and clasps
- Wire
- Your trusty pliers/wire cutter tool of greatness
- Fabric scraps (leftovers from all the fun T-shirt crafts we made and denim scraps from a pair of cutoffs)
- Whatever else you want to braid in there because it is a free country
Once you have ransacked your room for whatever is braidable, start laying out your materials. Make sure to put the longest chain aside so that it can be the base chain of the necklace, which will hold the braid. Separate your braidable goods into three groups of about equal amounts of items, aiming for around four strands or so for each section. Make sure the sections have equal distributions of the different types of materials. Read: Don’t put all the chains in one of the three sections unless you want one strand of the braid to be really chain heavy and that is your choice. I just don’t personally recommend it. You may need to trim the different chains you have down to one consistent length so that you aren’t getting all tangled up in one freakishly long chain. Once you have made your three groupings, wrap some wire around the top of each grouping so that each of your three sections can be held together.


Find that long base chain you laid aside earlier and reassure it that you still love it and that you weren’t abandoning it (or maybe only I talk to inanimate objects). Trim this chain down to the desired necklace length. I decided to lay mine out as is and trim from both ends later if need be because then you don’t have to worry about the length of the braid and braiding materials and how that fits on the chain. Center your three strand groupings on the main chain and attach them with the wire. Work through the pain of the wire poking you to make sure that it is wrapped well. Pull out that faithful duct tape from last week’s craft (actually you should just have duct tape for general purposes. You couldn’t imagine how many people ask me for my black duct tape to mend a hole or rip in black boots) and tape down all the braidable goods so that you can braid without stuff moving all over the place. Now, you can finally braid that sucker.


Once you have fully relived those fun school days of braiding your bestie’s hair as she sat in front of you in class, bind the end of the braid with wire. The instructions from Pinterest tell you to wrap a shoelace around both ends to make it look more finished, but that would require precise wrapping and gluing, and I am not about that life. Instead, I wrapped some of my scraps from my braided T-shirt headband craft around the ends, knotted them several times and cut off the excess.


You may need to trim the main chain now. So put on your best model face, “smize” enough to make Tyra Banks proud and check in the mirror to see what length of necklace you want. Once you figure that out, use your pliers/wire cutters to either cut the chain or open a link to disconnect whatever part you don’t need. Then, you can complete your necklace by using your pliers to connect the clasp to one end and connect a jump ring to the other end if the chain won’t just clasp well by itself.

Whoopee! You have a chunky statement necklace that no one else will have! I can’t wait to pair mine with a little black dress! As always, happy crafting, and go Tigers! Also, happy March Madness!


0 comments:
Post a Comment