

So, Glossers, there has been some not-so-fun things happening all around the world this past week, which has gotten me down in the dumps. But, never fear, a new DIY is here. Plus, pearls are a girl’s best friend (I mean, diamonds are, too, but those are more expensive and Michael’s has glass pearls). So, I thought I would combine my love of pearls and Peter Pan collars to create a Peter Pearl collar necklace!
Your pearly project list:
- String of pearls (either go to the thrift store and get some old pearl necklaces/costume jewelry or go to Michaels and get some glass pearls. I got 8mm pearls.)
- Felt (I got the stiffened kind so that the collar will hold its shape)
- Hot glue or super glue
- Lace or ribbon (this is to make the ties of your necklace)
- Some paper and pencil (this is to trace out a collar template)
- Some needle and thread (that is if your pearls aren’t already strung)
- Scissors and shears (Scissors are for paper. Shears are for fabric and thread. DON’T MIX THEM UP OR ELSE YOU WILL HAVE SOME DULL SHEARS AND THAT IS NO FUN.)

After you have the shape for your collar down, cut out the shape still folded so that when you are done cutting you open it up and it is the full collar shape. Take this paper collar and lay it down on the felt, adjusting it by folding in the center a bit if you need to make the collar wider, etc. Once the paper template is how you want the felt one to look, trace that on the felt. Now, cut out the felt collar.


If you all you want is a stiff, felt collar, cut some holes in the ends of the collar, thread some ribbon through the holes and you are done. But, this is a PEARL Peter Pan collar, so you need pearls. But, to be safe, cut those holes at the ends of the collar so that you don’t get overzealous with the pearls and glue, and you have no way to tie your creation around your neck. If you have a hole puncher, that works really well for this.

Now that your collar has some holes in it, it is time to make it pearly and pretty! If you are like me and have unstrung beads, you are in for the fun of stringing them onto some thread with a needle. I strung mine as I went by stringing a whole bunch on and then gluing them down. I then kept stringing more on as I continued going around my collar and gluing. I started by gluing the string around the outline of the collar.


Once I finished the outline, I started filling in the inside. For me, this is easy because I can adjust slack in my string of pearls, but if you have the kind of costume jewelry pearls that don’t move on their string you may need to cut sections of it to make the beads lie the right way as you glue them down.


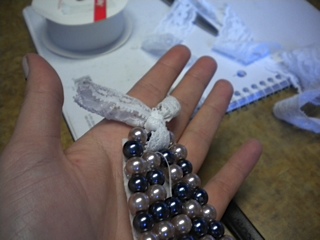
Now after you have painstakingly filled your collar with pearls (hopefully it wasn’t actually painful though, hot glue guns can be out to get you), you are in the home stretch. Pick up your ribbon or whatever you are using to make the “chain” for your necklace (I am using stretchy, lace ribbon) and thread an end through one of the holes you made earlier. Double (or triple, if you are feeling ambitious) knot that end and repeat on the other end. Right now you will have a closed loop, so you want to cut the ribbon in the middle so that you can tie your collar around your neck.


Yay! You did it! You now have a super cute, pearl Peter Pan collar necklace! This is perfect for dressing up any plain T-shirt! I mean, it is perfect for most things, actually, because that is how adorable it is! As always, happy crafting, and go Tigers! MIZ-DIY!
This Peter Pan collar tutorial is part of Veronica DeStefano's weekly DIY column, inspired by projects found on Pinterest.com.
This Peter Pan collar tutorial is part of Veronica DeStefano's weekly DIY column, inspired by projects found on Pinterest.com.


This is so cute.
ReplyDelete