

For several years now, I have been using my summer break to try and get in great shape. That seems pretty typical because lots of people want to get that coveted bikini bod. Whether I use a Seventeen magazine workout plan (those are surprisingly effective), home workout video, go to the health club or just run and bike on the forest preserve trail next to my house, I try anything to stay active and fit. After completing my first year of college that ended with a lot of stress, late night eating, not enough working out and a little extra weight, I knew that this summer was mine to get my butt in gear.
Sometimes the motivation doesn’t always come easily, but nothing motivates me more than cute workout clothes. I fawn over the fashion of Nike and lululemon, but sometimes you can create an adorable look without breaking the bank! Yay craftiness for the ability to make cute workout tanks!
Pre-workout necessities:
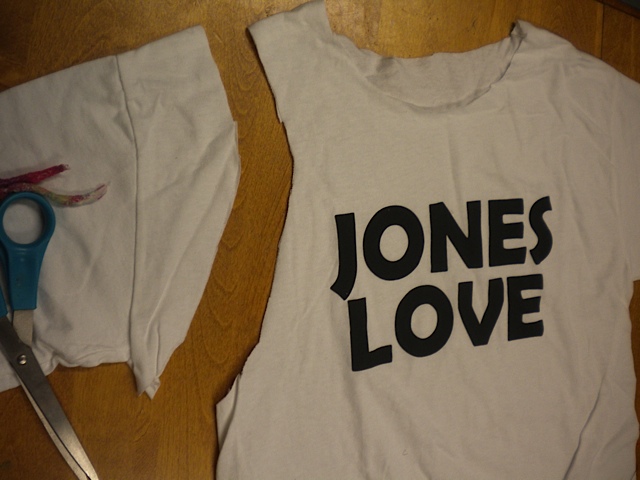
- A T-shirt (We all have that stack of free shirts that we only wear to workout anyways. I am using an old shirt from Jones Hall that I got to get me pumped about being an RA there!)
- Fabric shears (If you have been following my DIYs, you should know the difference between scissors and fabric shears and you probably have already invested in a pair. They will make your college crafting and T-shirt cutting life much easier.)
- Yes, that is all you need. Super easy, folks.
Start by cutting off the crew neck collar of the shirt. To avoid cutting way deep into the back due to cutting around the front part of the collar, don’t cut through both layers at once. Snip next to the collar to get started and then cut through one side and go around to the other. This isn’t that terribly important for this DIY because we will be cutting into the back anyways, but it is a good habit to form.


Now it’s time to turn this tee into a tank! Cut off one sleeve, sort of following the shape of the armpit seam. You get to choose how thick or thin you want the straps of your tank top to be depending on how close or far from the neck hole you cut the sleeves off. After cutting the first sleeve, fold the shirt in half (hot dog style, if you go by preschool folding styles) to use the cut part as a template for cutting off the other sleeve.


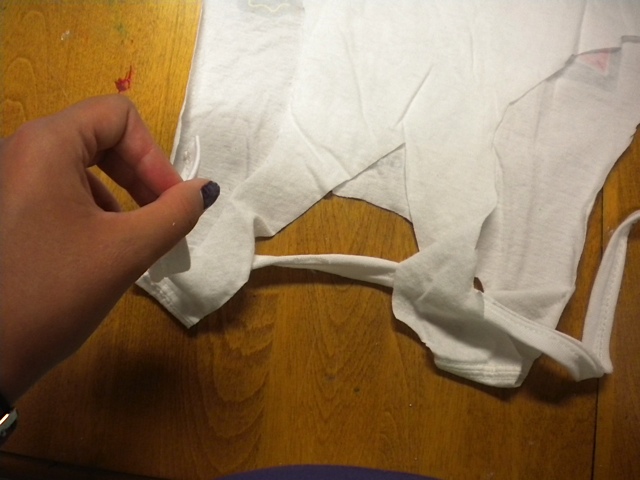
After the transformation from T-shirt to tank top is complete, cut off the hem of the shirt. Make sure the bottom of the shirt is lined up so that you aren’t cutting into the hem on one side. You will now have a little hem hoop. Cut the hoop so that it becomes one long strand. You can then cut the excess fabric on the other side of the hem. Gently stretch the hem strand by holding the two ends in either hand and pulling. Let that hang out on the side until we are ready for it.

Flip your shirt over to get to work on creating a sporty racerback. Use a pencil or your intuition to trace and cut deeper into one side of the back to create a racerback. DO NOT CUT THROUGH BOTH SIDES. The key word in racerback is “back.” Just cut the back. Got it? Good. (Glossers, I am ashamed to say that I accidentally cut through the front of my Jones T-shirt, so I cried a bit and sang Hannah Montana’s “Nobody’s Perfect” and grabbed my white Blackhawks Stanley Cup Champions shirt. Don’t judge me too hard.) Use the piece you cut from the one side to be the template to cut the other side.


After you wipe that nervous sweat from your brow from cutting that racerback, cut a deep “V” shape (For Veronica! Oops, sorry that is my natural reaction because I guess I am a kindergartener.) into the back of the shirt from the top.

Remember our friend, the hem strand? It’s time to bring him back into the game. Thread the strand through the straps of the tank top in the back and tie a double knot near the top of the “V” and then wrap it down the straps, around where the “V” is. Make sure you are pulling kind of tight when you wrap the strand down the straps. Once you are done wrapping, tie a double knot at the end of the wrap. Cut the excess ends of the strand.

Now it’s time to make neck and hemline decisions! You can cut a deeper scoop neck into the front of the shirt or leave it as is. I am, obviously, a v-neck fan but I am not doing that on my shirt today. For the hemline, you can leave it as it, make it cropped, make it high low or make it like a baseball shirt, high cut on the sides. I decided to do the baseball cut, so I folded my shirt in half and cut a curved line, starting high on the side and ending low at the fold.
Once you have done all the hemline and neckline cutting that your heart desires, you are done! You can try on the tank top to see if you need to adjust any cuts or stretch the top to create skinnier straps and make the cotton jersey taut. You can modify this DIY by tie-dying your shirt before you cut it. Now you can throw it on over your sports bra and get to working out! You’ve got this, Glossers!
By: Veronica DeStefano | Images: Veronica DeStefano | Instructions: Source


0 comments:
Post a Comment